“Beauty lies in the eyes of the beholder”
This holds true for blog posts too. Not only does great content matter, nice layout and presentation is equally important. Writers pour tons of hours sprucing up the looks; but many hardly give consideration to the web crawlers that index those pages. Clean HTML is a vital aspect in making crawlers fall in love with your posts.
Giving attention to a handful of rules can make big difference to the way crawlers see and index your posts. Given below are 7 golden rules to keep in my mind while composing a post in wordpress.
1. Enable Kitchen Sink in Post Editor
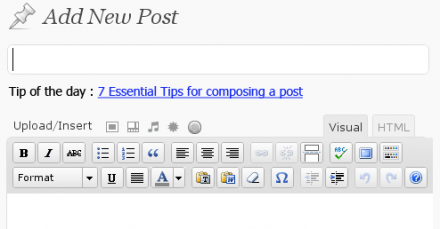
The native post editor that comes with wordpress doesn’t support many formatting options. If your editor toolbar looks like this:
Click on the button “Show/Hide Kitchen Sink”. You will get slightly richer tool set, like this:
2. Spruce up WordPress Editor with TinyMCE Advanced Plugin
Working with the native post editor, leave you with a longing for more controls. TinyMCE Advanced plugin provides tons of WYSIWIG tags which will make you say “Yeh Dil Maange No More!”
The plugin can be installed and configured in a jiffy.
Step 1: Download and Install TinyMCE
Go to Install Plugins page (Plugins->Add New) and search for “TinyMCE Advanced”
Click Install.
Step 2: Arranging TinyMCE Buttons
This could be a daunting task! TinyMCE is heavily loaded with tons of options such that pick and choose could take you a while.
Go to Tools -> TinyMCE Advanced option and then drag and drop your options to the toolbar.
Head the advice (in red letters) and Save Changes when you are done.
Step 3: Preview and Trial Run
Go back to “Add New” post option to see the plugin in action.
3. Format Proper
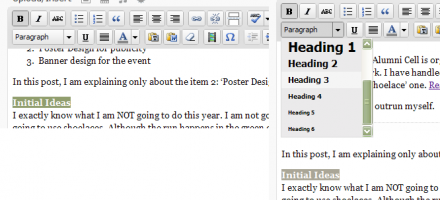
It is very important to format a post keeping in mind of the various search engine web crawlers. Since the only way crawlers understands a post is by looking at the HTML tags, proper formatting dramatically improves effectiveness of indexing.
To site a simple example, you can either bold a heading or use header HTML tag as shown below.
4. alt Attribute
alt tag is defined as:
A proper alternate text for images plays a vital role in increasing the visibility in image searches as they essentially describe the image. But even the most popular sites often conveniently ignore this little caveat.
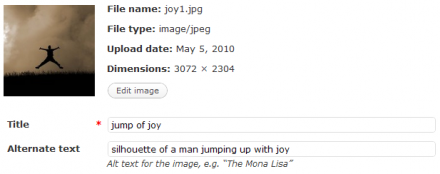
While adding images to a wordpress post, remember to specify a meaningful alt text, like shown below.
The title field doubles as tooltip for the image.
5. Meaningful Category and Tags
While categorising and tagging a post, always keep in mind that those keywords describe the post. It is noticed that crawlers and search engines assign greater weight to these keywords. Use your better judgement while assigning these values.
6. Importing posts composed in MS Word
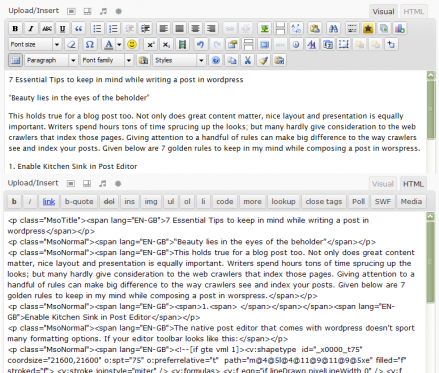
If you are in the habit of composing your posts in MS Word and finally copy + paste-ing the finished draft, beware. Even though the layout will more or less look the same, if you check the HTML source, you can see that a lot of junk HTML tags are added.
For example, if I pasted this post and check its HTML source, it will look like this.
Initially you may not encounter any issues, but I have experienced that later on when you want to edit something, layout will go over the hill.
If you use the Paste from Word button (paste the contents from the word file into the window that pops up), the pasted post will be clean.
7. Do not use image resize HTML attributes
Another often overlooked mistake is resizing a big image inside the post using HTML tags – width and height. Not only does it increase the download size of the post, also it puts unnecessary overhead on the browser. So it is always advised to properly resize the dimensions of the image, after it is uploaded, using the Edit Media tool of WordPress.
WordPress Media Library’s Edit Media supports resizing, cropping and scaling of images. Use it to appropriately resize the image.
And that’s it!
Now let me hear from you. Share your thoughts below.


1 Response
[…] know I have already discussed this plugin in this blog, but still TinyMCE Advanced needs to be retold simply because of its […]