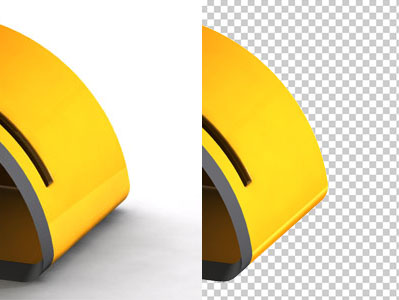


I do most of my product designs in SolidWorks tool. When I am happy with a rendered image of the model, I use Photoshop to enhance this JPG image by adding backgrounds. The only hitch in this process is cutting-out the model from its default background using a combination of Magnetic Lasso and Magic Wand tools in Photoshop. If the model is a complicated one, this process takes a lot of time and needs considerable patience.
Yes, there is always a solution to a problem. This is how I solved it.
PhotoWorks
I use PhotoWorks, the SolidWorks Add-In, for the rendering of a model. PhotoWorks can be activated by going to ‘Tools -> Add-Ins…’ and checking the box for PhotoWorks.
Steps for Rendering
After finishing your model, follow these steps to render it in a transparent background.
1. In SolidWorks, go to ‘PhotoWorks -> Scene’
2. ‘Scene Editor’ box opens out and we are in ‘Manager’ tab by default. I selected ‘Conference Room’ in the folder ‘Studios.’
3. Now click on the ‘Room’ tab.
4. Under ‘Visibility and materials,’ make sure that the boxes for ‘Visibility’ and ‘Reflective’ are unchecked.
5. Click ‘Apply’ and close the ‘Scene Editor’ box.
6. Now, render the design by using ‘PhotoWorks -> Render to file…’ option.
8. Save the image output as TIF (8bit RGBA TIFF) file.
The output TIF file, when opened in Photoshop, will have transparent background! This helps you to add any background to the image.
I am sure that you will find this tip useful and saves a hell lot of a time while editing the rendered file in Photoshop.
More reading/Viewing
A good in-depth video tutorial is available at ‘SolidWorks for Industrial design’ website. You need Flash Player to view it. Also, a PDF version is available for download.
‘Rendering with a transparent background’ — Written by Ryan Olson
Software: SolidWorks 2007


Thank you!!!!!
PNG is a good option too.
Thanks!