
“Wow! This is cool…”
I just finished watching the now viral Cadbury India’s “5 Stars Everywhere!” ad film and the central idea stayed with me for sometime. And then I had the brain wave — If Cadbury can use star ratings on apps for a chocolate advert, Coca-Cola also can use thumbs up icon on apps for a beverage ad!
Thus, inspired by Cadbury 5 Star video, I created an ad film for Thums Up — using “nothing” (well, using only free online resources and Microsoft PowerPoint)!
My Film: “Thums Up Everywhere”
Some of you will pickup the ‘subtle’ hints of MS PowerPoint in action — the robotic zoom-outs, the ‘curtain’ animation, the unmistakable ‘Fade’ transitions…
Detailing out the entire PowerPoint film making process here, in this blog now, is not very practical. So I will release a “How to?” video showing a screen recording of the entire process. Don’t forget to subscribe my ‘designPULI YouTube channel.’
DISCLAIMER— This is an unsolicited design attempt and is a fun, personal project inspired by Cadbury 5 Star India ad. I’m not in any way associated with Coca-Cola India and Thums Up. This video contains NO paid promotion/ product placement/ sponsorship/ endorsement. All logos and trademarks belong to the respective owners. No disrespect is intended to the creators of the original ad. Peace!
The Source of Inspiration: Cadbury 5 Star Ad
What can I say? This is a really cool idea and a brilliant execution.
Ask Me Anything (AMA)!
Today, let me try to answer some of the burning questions in your mind.
Wait, Microsoft PowerPoint can generate a video output?
Yes! You can convert any PowerPoint slides to a beautiful HD or 4K video (MP4 format) by:
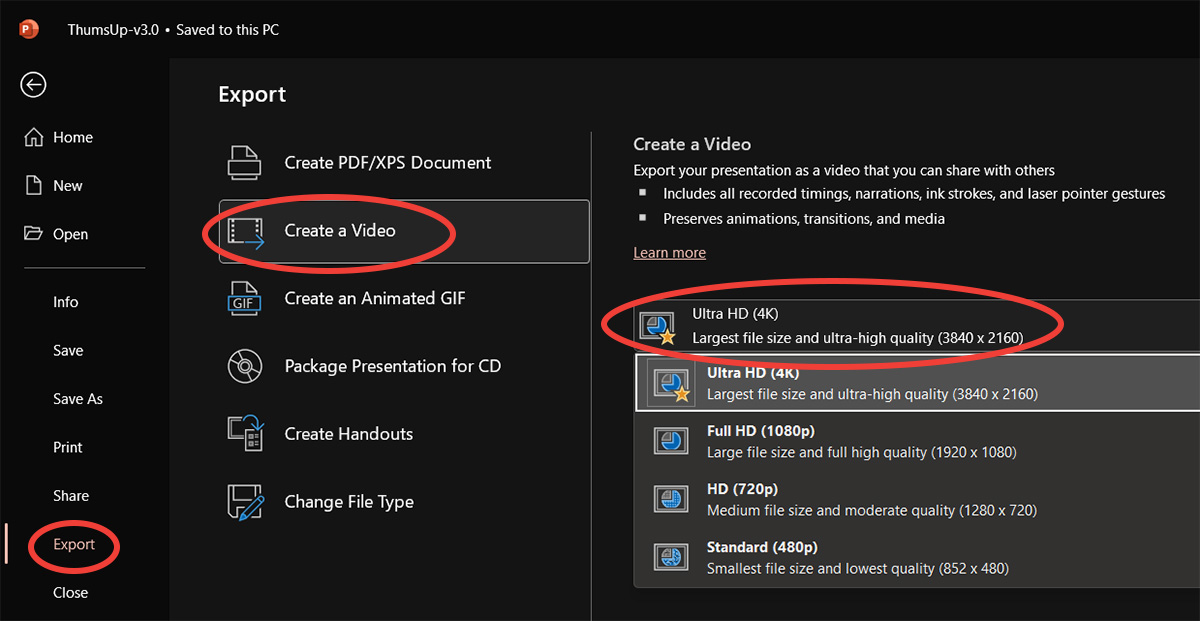
File -> Export -> Create a Video -> Full HD (1080p) or Ultra HD (4K)
If the slide transitions are not timed, the final video out will have each slide shown for 5 seconds (default; it can be changed) and then it will advance to the next slide till the end. Any animations appearing on the slides as well as the slide transitions one after the other — all will appear just as a slideshow in the exported video.
Sound! Tell me all about the sound!
Some of you might be regularly embedding videos in PowerPoint presentations at work. But very rarely I have seen PPTs embedded with audio. Let us look at some basics.
My video features three tracks of audio.
- First one is the narration track.
- Then we have the background music (bgm).
- And then we also have audio effects or Foley sounds (brief sound of people applauding, camera click sound…)
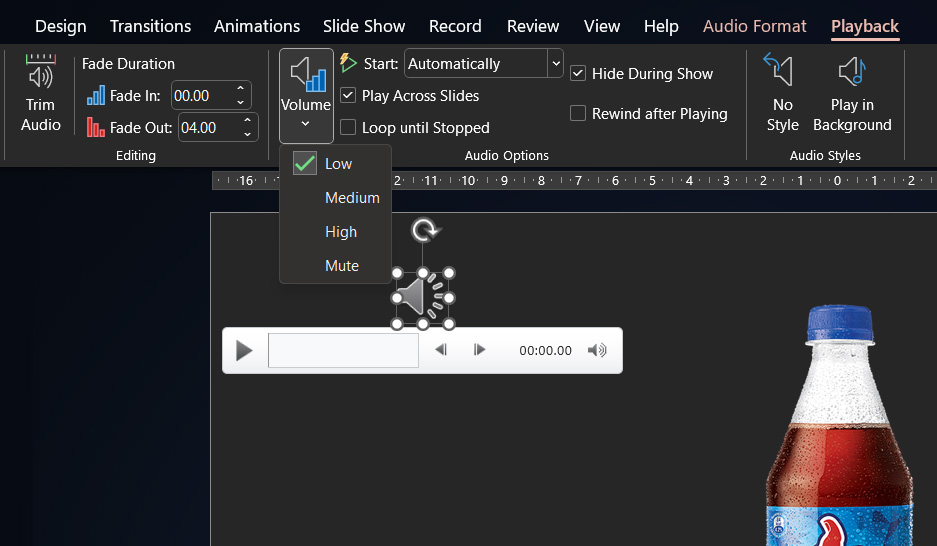
I usually just drag and drop audio clips (MP3 or WAV) into the slide. All the ‘Playback’ settings on the above screenshot control the behavior of audio clips on the slide. Select the audio clip first and then moving from left to right on the above image, we have the following settings…
- Trim Audio
Audio clips on the slide can be trimmed to the required length using this menu. The cool part is that it does not discard the unused part of the clip. This helps us to fine tune the starting and ending timestamps of the audio. - Fade In
We can add a ‘fade in’ effect at the beginning of the audio clip so that it doesn’t start abruptly. The length of ‘fade in’ depends on the number of seconds entered here. - Fade Out
Here, we can add the number of seconds for a ‘fade out’ effect at the ending of the audio clip. So the audio fades smoothly avoiding an abrupt cut. - Volume
Usually I select ‘Low’ volume level for background music, ‘Medium’ for audio effects and ‘High’ for narration track. - Start: Automatically
I always use ‘Automatically’ here.
Finer control of the beginning of audio playback can be achieved by adding a ‘Delay’ along with ‘Start with previous’ or ‘Start after previous’ options under the ‘Animations’ menu (Not shown in the above screenshot). - Play Across Slides
For audio like background music that needs to be played uninterrupted across multiple slides, this option has to be checked.
For short audio clips (example: audio effects) that need to finish playing within that one slide itself, this can be left unchecked. - Hide During Show
Always check! This determines whether the audio icon needs to be visible on the final video. Who needs that?
The narration appears to be less natural and more robotic. Why is it so?
Hmm… you are sharp! I had the option of employing a good voice artist to readout the script with the right intonations and emphasis. Then I had to rent a professional sound studio with the high quality audio equipment to record the voice performance. Since I’m determined to spend ‘nothing’ on this video production, I took the easiest and faster way! I created the narration audio file using Wideo — a free online ‘Text-to-Speech’ (TTS) conversion tool.

There are many male and female voices available to choose from, I opted for ‘English (India) – Peter Moore.’ The free version of this tool has a daily character limit of 2000 characters, but my entire script was around 700 characters only.
How did you do the ‘curtain reveal’ animation?
That is just one of the built-in slide transitions available in PowerPoint. No genius there!
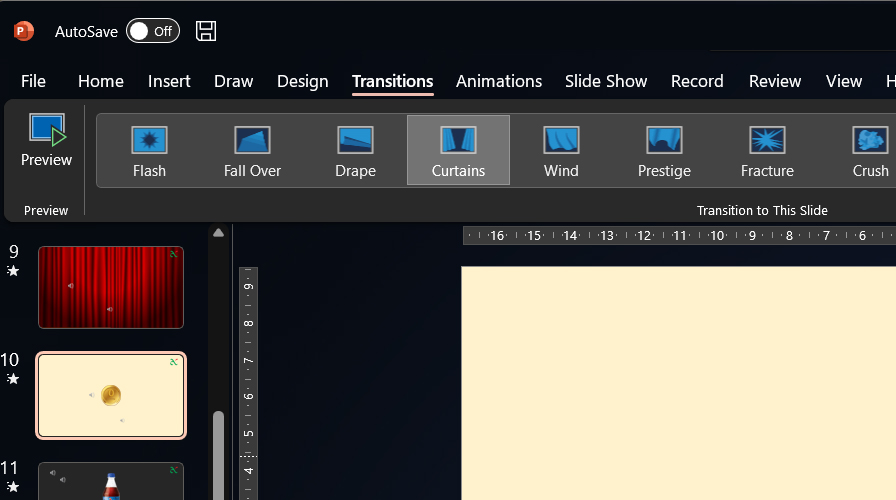
Transitions are always added on the slide to which we need to transition to. Refer the above screenshot — I added the image of a red curtain on slide (9). The next slide (10) has the coin. To apply the transition effect, just select the ‘coin’ slide (10) and click on ‘Curtains’ on the ‘Transitions’ menu. That’s all!
I briefly considered ‘Wind’ and ‘Prestige’ transition effects before settling on the current ‘Curtains’ effect. I wanted to use the one effect many people usually see in PPT presentations. This is a dead giveaway to trace the origins of this video to MS PowerPoint!
What is the secret behind the smooth ‘Zoom Out’ animation on those mobile app screenshots?
There are multiple ways to achieve this ‘Zoom Out’ effect. The most common method is to employ the built-in ‘Grow/Shrink’ Animation on the element (app screenshot image).
But there is a very easy method as well — use the ‘Morph’ Slide Transition instead of the ‘Grow/Shrink’ animation! ‘Morph’ Transition is simple; but very powerful! We can perform amazing magic using just this one transition. Essentially we are creating a source state on one slide, then duplicate this source slide to create the target slide. On this new slide, define the target state by moving around the components or changing their dimensions, colors, or introducing new components… Then apply the ‘Morph’ transition on the target slide to see the magic!
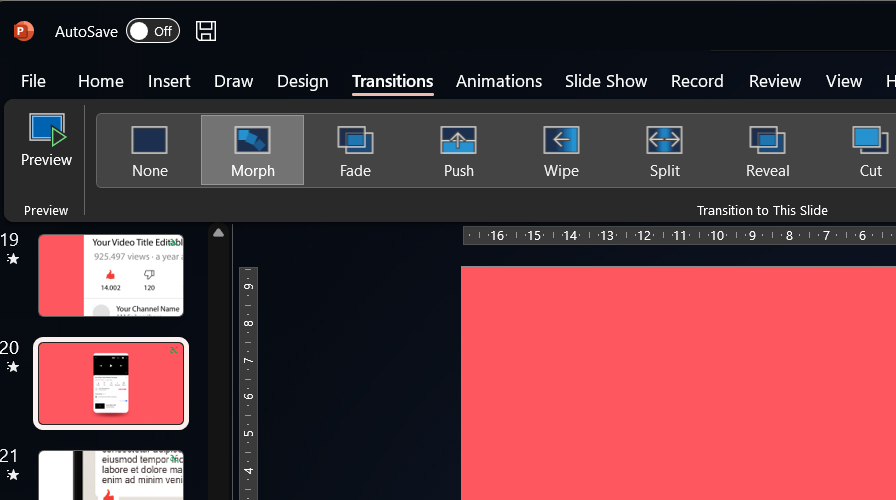
Refer the above screenshot — I scaled up the app screenshot image of YouTube on slide (19) clearly showing the enlarged ‘like/dislike’ buttons. The next slide (20) has the same screenshot; but with the normal image size. To apply the transition effect, just select the ‘zoomed out’ slide (20) and click on ‘Morph’ on the ‘Transitions’ menu. This gives a smooth ‘Zoom Out’ animation.
I’m wondering how ‘Closed Captions’ (CC) can be created so that my YouTube video also has subtitles.
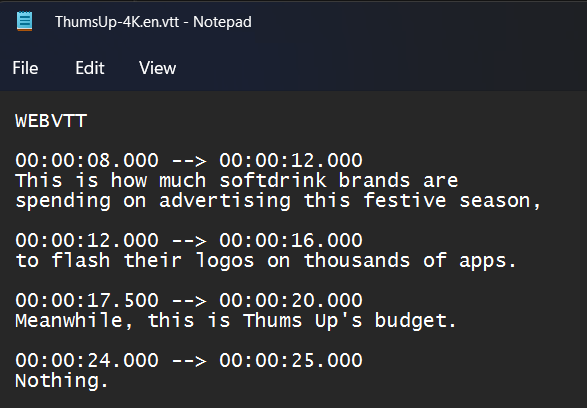
Here is an excellent step-by-step tutorial on creating a CC file by Microsoft — “Create closed captions for a video.” YouTube Studio has an option to upload this ‘VTT’ file with timings and the subtitles will appear on the YouTube video based on the encoded timings from this file.
‘Closed Captions’ (CC) are enabled by default for your YouTube video. Where is this setting in YouTube Studio?
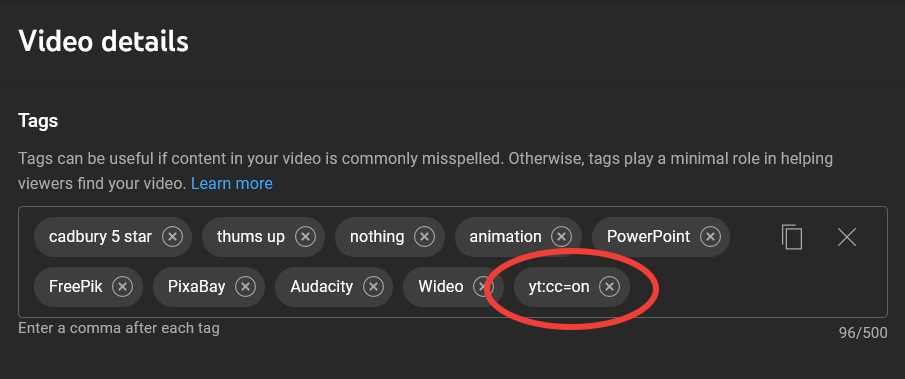
This was a surprise to me! On searching the internet, I was told to add the tag “yt:cc=on” (without the quotes) under the ‘Tags’ section of my video. This forces YouTube players to switch ON ‘Closed Captions’ by default when my video is being played.
Are you holding back any secrets?
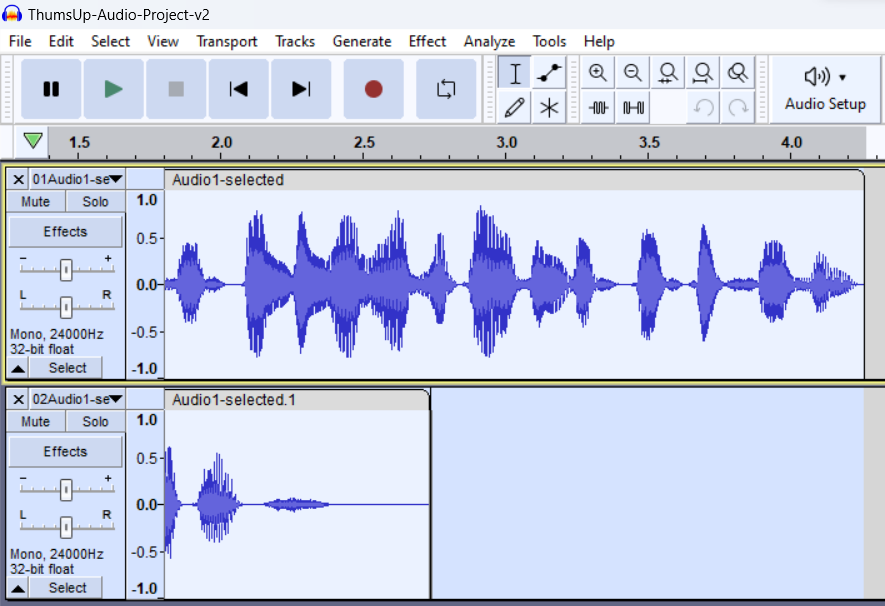
Well, to make the narration track more audible, I had to add a ~5dB amplification. For this, I used Audacity — the free, open source audio tool.
A weekend, well-spent!
I really enjoyed this whole journey of creating ‘Thums Up Everywhere!’ fan video. It took an entire weekend to arrive at the best way of representing the central idea. And, I’m a happy man! If you have more questions, do ask them below in the ‘Comments.’
Special Thanks to Shanty, Praveen and Jayakrishnan for their valuable inputs to this project.
Free resources used in this project
- Happy Acoustic Guitar Background Music by Music Unlimited: Pixabay
- Bubble Pop by blue2107: Pixabay
- Success Fanfare Trumpets by FunWithSound
- iPhone Camera Capture by pooky1: Pixabay
- Small applause by Breviceps: Pixabay
- Gold coin stacks mockup cash heap wealth by studio4rt: FreePik
- Bank vault realistic composition by macrovector: FreePik
- Youtube phone screen with flat design template by BiZkettE1: FreePik
- Flat design linkedin mockup by Freepik
- Facebook on mobile phone mockup by syifa5610: FreePik
- Whatsapp interface template on mobile phone mockup by Syifa5610: FreePik
- Golden coin with word bitcoin by brgfx: FreePik
- Theater cinema curtains with focus light vector illustration by starline: FreePik
- People in supermarket illustration. big store with products by macrovector: FreePik
- App template for travel booking by FreePik
- Travel onboarding app screens by pikisuperstar: FreePik
- App to learn languages by pikisuperstar: FreePik
- Furniture shopping app interface by FreePik
- Charity app interface screens by pikisuperstar: FreePik
- Beauty salon booking app by FreePik
- Meditation app interface by pikisuperstar: FreePik
- Sweet soda banner by upklyak: FreePik
- Lemon water ad banner, blank bottle with drink by upklyak: FreePik
- Realistic mango juice ad template by pikisuperstar: FreePik


